Often a requirement comes to secure the application as well as the connections made to that application.
Prior to TLS 1.2, many versions of SSL and TLS came into existence to enforce transport layer security. Those previous versions were vulnerable to some sort of attacks\threats and those were fixed in their next version.
In order to enforce security, you may just want to accept connections over TLS v1.2 and thus only enable TLSv1.2 while disabling all other versions- SSLv3, TLS 1.0, TLS 1.1 etc
The purpose of this article is to list down the steps required to enable only TLS 1.2 and disable all other versions in a Springboot Application.
PRE-REQUISITES
JRE
IDE of your choice
Springboot Application
Certificates – be it Self Signed or from Public CA
This article assumes that your application has already enabled SSL in your application and configured certificates and secure HTTP Connectors either programmatically or through configuration.
HOW IT WORKS?
Before we look into the steps, lets first understand how things work. Basically, an application sets up a virtual host/container – Jetty or Tomcat or Undertow etc as well as HTTP Listener(s).
In a Springboot application, embedded containers can be setup using
EmbeddedServletContainerFactory
during bootstrapping.
For tomcat,
TomcatEmbeddedServletContainerFactory
is initialized and likewise. These containers set up Connectors (HTTP) and configure connectors for
Port
URI Encoding
SSL Settings optionally
Compression optionally
Protocol Handler etc
HOW TO DISABLE SSL or < TLS 1.2 ?
In < Springboot v1.4.x versions
For Springboot applications with versions < 1.4.x, there is not any support to disable protocols through configuration. APP YAML configuration has few properties to enable SSL but it does not provide a mechanism to set SSL enabled-protocols
Thus, changes have to be done programmatically.
But how?
Do i need to initialize Tomcat Factory and Connector and stitch everything ?
Luckily, not. Springboot allows to customize the existing Container and further customize Connector.
Does that mean i just need to create Customizer and somehow attach it to the existing initialized container?
Yes, that’s right.
Add the below code and Your Problem will be solved. What we are doing is that during Service bootstrapping process, we are injecting a
EmbeddedServletContainerCustomizer
and
TomcatConnectorCustomizer
beans and this way Spring IoC Container will stitch them out for you.
@Bean
    public EmbeddedServletContainerCustomizer containerCustomizer(TomcatConnectorCustomizer connectorCustomizer) {
        return new EmbeddedServletContainerCustomizer() {
            public void customize(ConfigurableEmbeddedServletContainer container) {
                if (container instanceof TomcatEmbeddedServletContainerFactory) {
                    TomcatEmbeddedServletContainerFactory tomcat = (TomcatEmbeddedServletContainerFactory) container;
                    tomcat.addConnectorCustomizers(connectorCustomizer);
                }
            }
        };
    }

    /**
     * Sets up the Tomcat Connector Customizer to enable ONLY TLSv1.2
     * @return Reference to an instance of TomcatConnectorCustomizer
     */
    @Bean
    public TomcatConnectorCustomizer connectorCustomizer() {
        return new TomcatConnectorCustomizer {
        @Override
        public void customize(Connector connector) {
            connector.setAttribute("sslEnabledProtocols", "TLSv1.2");
        }
    }<span 				data-mce-type="bookmark" 				id="mce_SELREST_start" 				data-mce-style="overflow:hidden;line-height:0" 				style="overflow:hidden;line-height:0" 			></span>;
    }
In < Springboot v1.4.x versions
For Springboot applications > 1.4.x, things have been made much simpler and can be done through YAML configuration.
Amazon Web Services aka AWS provides many SaaS products.
In this post, I want to share my learnings and experiences while working on one of the SaaS Products called LAMBDA.
I’ll begin with explaining our use case a bit and then implementing and Deploying a Lambda.
USE CASE
I was working on designing and implementing on a requirement to ticket the Air Bookings. Without Ticketing, user cannot board a flight and thus fly.
MORE ABOUT TICKETING PROCESS
Ticketing is an orchestration of series of steps, some require Biz Logic evaluation and some require interacting with different 3rd Party Services multiple times over the network.
This process can be seen as event driven, can be done asynchronously with retry capabilities, scheduling capabilities, involving interaction with 3rd Party Services over the network.
It has to be completed within time constraints as per Airlines\GDSes otherwise user cannot fly.
After gathering requirements, it seems to be a usecase of building a BOT, a Ticketing Bot, more specifically and “Executor-Schedulor-Supervisor-Agent“ Pattern fitting very well technically.
WHAT IS “EXECUTOR-SCHEDULOR-SUPRVISOR-AGENT“?
It’s a Pattern where in roles and responsibilities are clearly separated out to different actors\components.
Executor, Supervisor, Agent represent different Blocks and each is responsible to perform clearly defined task.
Executor is responsible to execute the Orchestration and likewise for other. You may choose to use Persistent Workflow frameworks, Queues for orchestration execution.
WHERE DOES LAMBDA FIT IN OUR CASE?
Ticketing Process has to be completed for multiple bookings. After all, multiple users are doing bookings on our site.
This demands multiple executors to be running in parallel and executing an orchestration independently with no interference.
Obviously, you will want that each executor picks a different Booking for ticketing.
For this, you will have synchronization and other checks in place so that once booking is owned by any executor, it does not get executed by another Executor.
Let’s say, we have a strategy that once a booking is picked by an Executor, executor updates a workItem with it’s ownership, timestamp and changes it’s status to In_Progress to reflect that Ticketing Process has been kicked in.
Now think of a scenario where in
an executor(s) (Server) performing a ticketing process, crashes in the middle of the process.
Server has been put Out of Rotation due to being Unhealthy
Or, you want to deploy the incremental changes and that may involve halting\interrupting the currently executing Ticketing Processes.
The 3rd scenario can be dealt with publishing Events to reach to a consistent state and stop further processing.
But, what about other Scenarios ? In that, Ticketing Process(es) will appear to be running with In_Progress status while that’s not the case.
How will you ensure that those Processes get completed later?
We will for sure want to complete the Ticketing Process at any cost.
What if we have something which can detect such Stuck Bookings and reprocess them from the last checkpoint.
Lets just focus on Supervisor.
What is the role of “Supervisor”?
Supervisor is a component made responsible to detect such Stuck Bookings and queue them for further re-processing. Note that it does not start executing those processes, instead it just re-queues them so that an executor an pick it up again.
In our case, Supervisor has to connect to Queues\Data Stores hosted in VPC.
Ok. What are the other expectations from this Supervisor?
It has to be Available. You would not want your Supervisor to be down for a long time. However, you would want that when
A Single Supervisor can fulfill the need. No need to run the multiple Supervisors at a time.
Supervisor running periodically.
Supervisor running in background
Supervisor has no state attached to it
All the above expectations made LAMBDA a good Fit in our case.
Enough of the story 🙂 Before you start cursing me, let’s start building a Lambda.
LAMBDA
Lambda is a function that can be executed in AWS Cloud environment based on certain trigger policies. Trigger can be a scheduled timed event or S3 event or likewise.
Building a Lambda is simple. It requires a function which has to be executed based on a trigger policy. As such, Lambda can be in Java or Python or Node till this time.
Lets Build Lambda in Java.
Create a Class (any name) MyFirstLambda and a function handler (any name), handler as below:
public class Supervisor {
    public void queueStuckOrdersForReprocessing(Context context) {
        // Implement this function as per tasks need to be accomplished
    }
Implement handler function keeping in mind the task you want to accomplish. In our case, we wanted to detect and queue the Stuck Bookings for re-processing.
public class Supervisor {
    public void queueStuckOrdersForReprocessing(Context context) {
        LambdaLogger logger = context.getLogger();
        logger.log("Supervisor Cycle Started");

        // Problem: Time Consuming while actual task is pretty small
        // Problem: How can i Initialize based on environment or profile like Spring Profiles
        QueueingService queueingService = this.initialize();

        logger.log("Supervisor Initialized");

        // Problem: How can i execute Multiple Tasks in Parallel
        this.buildTask(this.enrichedQueueingService, "Enriched").run();

        logger.log("Supervisor Cycle Completed");
    }

    private String getProperty(String name) {
        return System.getenv(name);
    }

    private QueueingService initialize() {
       return new QueueingService() {
                public QueueingService() {
                   // Initialize, it could be Time Consuming.
                   // You may be using MongoDB as a Queue and initializing might take some time
                }

                /**
                     * Moves the products stuck in queue1 for past 'timeInSeconds' seconds to queue2
                     * @param queue1 Current Queue the Product is in
                     * @param timeInSeconds Time in seconds since product is not acted upon
                     * @param queue2 New Queue the Product shall be moved to
                     * @return No of Products got reset
                     */
                    @Override
                    public int move(String queue1, int timeInSeconds, String queue2) {
                        // your implementation here
                    }
        );
    }

    // Problem: Logger has to be passed everywhere we want to log
    private Runnable buildTask(QueueingService queueingService, LambdaLogger logger) {
        return new Runnable() {
            @Override
            public void run() {
                int noOfProducts =
                        queueingService.move(IN_PROGRESS,
                                Integer.parseInt(getProperty("IN_PROGRESS_AGE")),
                                REPROCESS);

                logger.log(
                        String.format(
                                "Supervisor requeued '%s' Products for ReProcessing",
                                noOfProducts));
            }
        };
    }
}
The above code works. However, it can be refactored and optimized further.
Let’s assume that Queues are maintained in a Database, MongoDB (No-Sql).
Initializing a MongoDB can take a lot of time while the actual task to be performed may not be that TimeConsuming.
You may ask that Is there a way we can initialize just once and thus be more performant and consume lesser resources?
Fortunately, there is.
AWS says that Lambda container can be reused for subsequent invocations.
Note the words can be. AWS does not guarantee but there is a possibility.
If that’s the case, to avoid re-initialization, how about maintaining Fields and use them. We can simple maintain QueueingService as a field\state in Supervisor class and use it.
Below is the refactored code.
public class Supervisor {
    private boolean isInitialized = false;
    private QueueingService queueingService;
    private LambdaLogger logger;

    public void queueStuckOrdersForReprocessing(Context context) {
        logger = context.getLogger();
        logger.log("Supervisor Cycle Started");

        // Fields are initialized and thus on reuse, will not be re-initialized
        // Problem: How can i Initialize based on environment or profile like Spring Profiles
        this.initialize();

        logger.log("Supervisor Initialized");

        // Problem: How can i execute Multiple Tasks in Parallel
        this.buildTask(this.enrichedQueueingService, "Enriched").run();

        logger.log("Supervisor Cycle Completed");
    }

    private String getProperty(String name) {
        return System.getenv(name);
    }

    private void initialize() {
       if (!this.isInitialized) {
       this.queueingService = new QueueingService() {
                public QueueingService() {
                   // Initialize, it could be Time Consuming.
                   // You may be using MongoDB as a Queue and initializing might take some time
                }

                /**
                     * Moves the products stuck in queue1 for past 'timeInSeconds' seconds to queue2
                     * @param queue1 Current Queue the Product is in
                     * @param timeInSeconds Time in seconds since product is not acted upon
                     * @param queue2 New Queue the Product shall be moved to
                     * @return No of Products got reset
                     */
                    @Override
                    public int move(String queue1, int timeInSeconds, String queue2) {
                        // your implementation here
                    }
        );
       this.isInitialized = true;
     }
    }

    private Runnable buildTask(QueueingService queueingService) {
        return new Runnable() {
            @Override
            public void run() {
                int noOfProducts =
                        queueingService.move(IN_PROGRESS,
                                Integer.parseInt(getProperty("IN_PROGRESS_AGE")),
                                REPROCESS);

                logger.log(
                        String.format(
                                "Supervisor requeued '%s' Products for ReProcessing",
                                noOfProducts));
            }
        };
    }
}
Great. I still have another problem. I want to execute multiple tasks but not Sequentially, in parallel instead.
AWS does allow creating Threads or ThreadPool(s) as long as CPU, Memory Limits are not crossed. Refer AWS.
Below code has a simple change to create a ThreadPool of size 1. Just change the size to create more threads.
public class Supervisor {
    private boolean isInitialized = false;
    private QueueingService queueingService;
    private LambdaLogger logger;

    public void queueStuckOrdersForReprocessing(Context context) {
        logger = context.getLogger();
        logger.log("Supervisor Cycle Started");

        // Fields are initialized and thus on reuse, will not be re-initialized
        // Problem: How can i Initialize based on environment or profile like Spring Profiles
        this.initialize();

        logger.log("Supervisor Initialized");

        ExecutorService executor = Executors.newFixedThreadPool(1);

        Future enrichedSupervisor = executor.submit(this.buildTask(this.enrichedQueueingService, "Enriched"));

        while (!(enrichedSupervisor.isDone() && supervisor.isDone())) {
                // spin and wait
                Thread.sleep(1000);
        }

        logger.log("Supervisor Cycle Completed");
    }

    private String getProperty(String name) {
        return System.getenv(name);
    }

    private void initialize() {
       if (!this.isInitialized) {
       this.queueingService = new QueueingService() {
                public QueueingService() {
                   // Initialize, it could be Time Consuming.
                   // You may be using MongoDB as a Queue and initializing might take some time
                }

                /**
                     * Moves the products stuck in queue1 for past 'timeInSeconds' seconds to queue2
                     * @param queue1 Current Queue the Product is in
                     * @param timeInSeconds Time in seconds since product is not acted upon
                     * @param queue2 New Queue the Product shall be moved to
                     * @return No of Products got reset
                     */
                    @Override
                    public int move(String queue1, int timeInSeconds, String queue2) {
                        // your implementation here
                    }
        );
       this.isInitialized = true;
     }
    }

    private Runnable buildTask(QueueingService queueingService) {
        return new Runnable() {
            @Override
            public void run() {
                int noOfProducts =
                        queueingService.move(IN_PROGRESS,
                                Integer.parseInt(getProperty("IN_PROGRESS_AGE")),
                                REPROCESS);

                logger.log(
                        String.format(
                                "Supervisor requeued '%s' Products for ReProcessing",
                                noOfProducts));
            }
        };
    }
}
Another problem, i have. I have different environments set up and in each environment, i have different settings, say mongodb cluster is different.
I want to package resource files in jar and load them as per environment rather than configuring each setting as an environment variable.
How can i initialize based on an environment?
Once again, AWS comes to a rescue. It provides an ability to specify environment variables while configuration and these environment variables get passed to Lambda Function as Environment Variables on each execution.
What if we set the Environment and based on it’s value we load the resource file like Spring loads the configuration based on Profile.
Let’s see how can this be achieved.
public class Supervisor {
    private static String MONGODB_URI_SETTINGNAME = "mongodb.uri";
    private static String IN_PROGRESS_AGE_SETTINGNAME = "inprogress.ageInSomeTimeUnit";
    private static String ENVIRONMENT_SETTINGNAME = "environment";

    private boolean isInitialized = false;
    private String environment;
    private Properties properties;
    private QueueingService queueingService;
    private LambdaLogger logger;

    public void queueStuckOrdersForReprocessing(Context context) {
        logger = context.getLogger();
        logger.log("Supervisor Cycle Started");

        // Fields are initialized based on environment and thus on reuse, will not be re-initialized
        this.initialize();

        logger.log("Supervisor Initialized");

        ExecutorService executor = Executors.newFixedThreadPool(1);

        Future enrichedSupervisor = executor.submit(this.buildTask(this.enrichedQueueingService, "Enriched"));

        while (!(enrichedSupervisor.isDone() && supervisor.isDone())) {
                // spin and wait
                Thread.sleep(1000);
        }

        logger.log("Supervisor Cycle Completed");
    }

    private String getSystemEnv(String name) {
        return System.getenv(name);
    }

    // This is to get the profile based properties
    private String getProperty(String name) {
        return this.properties.getProperty(name);
    }

    // This does the initialization
    private void initialize() {
       if (!this.isInitialized) {
           this.initializeProps();
           this.queueingService = new QueueingService() {
                public QueueingService() {
                   // Initialize, it could be Time Consuming.
                   // You may be using MongoDB as a Queue and initializing might take some time
                }

                /**
                     * Moves the products stuck in queue1 for past 'timeInSeconds' seconds to queue2
                     * @param queue1 Current Queue the Product is in
                     * @param timeInSeconds Time in seconds since product is not acted upon
                     * @param queue2 New Queue the Product shall be moved to
                     * @return No of Products got reset
                     */
                    @Override
                    public int move(String queue1, int timeInSeconds, String queue2) {
                        // your implementation here
                    }
        );
       this.isInitialized = true;
     }
    }

    private void initializeProps() throws IOException {
        this.initializeEnvironment();
        if (this.properties == null) {
            final String propFileName = String.format("application-%s.yml", this.environment);
            this.properties = new Properties();
            this.properties.load(Supervisor.class.getClassLoader().getResourceAsStream(propFileName));
        }
    }

    private void initializeEnvironment() {
        this.environment = getSystemEnv(ENVIRONMENT_SETTINGNAME);
        if (StringUtils.isBlank(this.environment)) {
            this.environment = "prod";
        }
    }
    private Runnable buildTask(QueueingService queueingService) {
        return new Runnable() {
            @Override
            public void run() {
                int noOfProducts =
                        queueingService.move(IN_PROGRESS,
                                Integer.parseInt(getProperty(IN_PROGRESS_AGE_IN_SECONDS_SETTINGNAME)),
                                REPROCESS);

                logger.log(
                        String.format(
                                "Supervisor requeued '%s' Products for ReProcessing",
                                noOfProducts));
            }
        };
    }
}
Package your code into Jar using mvn or tool as per your preferences.
DEPLOYING LAMBDA
Using AWS CMD CLI (Command Line Interface) to upload jar and other required/optional configurations
Through AWS console where in you can provide different configurations
HOW CAN I\WE ACCOMPLISH THIS?
We use different environments like Test environment, Stress etc before releasing to PROD and in each environment, we want to have different settings. How can we pass different settings like we can activate different Profiles in Spring? [ANSWER]: AWS allows to configure and pass environment variables to a Lambda on execution. While configuring a Lambda Function, define what environment variables need to be passed to your Lambda and then based on those environment variables, do things.
Our Lambda needs to connect to components\services deployed in our VPC. On execution, Lambda function is not able to connect to that component. [ANSWER]: AWS considers and enforces Security . To allow connections, configure Lambda with proper SubnetIds of your VPCs and permissions.
Our Lambda is not Event driven. It’s based on files wriiten in S3. How can we pass event data to Lambda? [ANSWER]: This blog focussed on Lambda with no event data, however AWS supports different events. Refer AWS. In order to pass Event Data to Lambda Function, handler function can accept more parameters. Parameter can even be of Custom Type and AWS takes care of Serialization and De-serialization.
THINGS TO KEEP IN MIND
AWS puts restrictions on executing Lambda – be it a size of the jar or constraints on resources like cpu, memory etc. Always check restrictions on AWS Site before considering Lambda.
Make sure that you understand the billing. Lambda is billed based on resources usage and the total time for execution.
FEW MORE TIPS
Give your Lambda a Good Name
Tag Your Lambda for proper identification and enforcing security policies
Do not package redundant dependencies. It can make your package heavy and may not be even fit to be run as Lambda.
Have CloudWatch Metrics’ based Alarms in place
Ensure that you do not over-configure your Lambda with all SubnetIds of your VPC.
When deploying your Lambda in VPC, Scaling has to be thought of properly
Have proper Logging for debugging and tracing purposes. Logs are available in CloudWatch as well
We often come with requirements which are suited for integrating Messaging Frameworks in the Software Systems.
There are many messaging frameworks available in the market – some are open-source, some are paid-licensed, some provide great support, have good Community support.
In order to make an apt choice, we look out and explore different messaging frameworks based on our requirements.
This post compares few Popular Messaging Frameworks and aims to provide or equip you with enough information to make a decision on choosing the best framework as per your requirements.
COMPARISON GRID
RabbitMQ
Apache Kafka
AWS SQS
HA
☑ Requires some extra work and
may require 3rd party Plugins like Shovel and Federation
☑ Out of the Box (OOB)
☑ OOB
Scalable
☑
☑
☑
Guaranteed Delivery
☑ Supports Consumer Acknowledgments
☑ Supports Consumer Acknowledgments
☑ Supports Consumer Acknowledgments
Durable
☑ Through Disk Nodes and Queues with extra configuration
☑ OOB
☑ Message Retention upto 14 days max and default being 4 days.
Exactly-Once Delivery
☑ Annotates a message with redelivered when
message was delivered earlier but consumer ack failed earlier.
Requires Idempotent behavior of a Consumer
☑ Dependent on Consumer behavior.
Consumer is made responsible to track Offsets (messages read so far) and store those offsets. Kafka started supporting storing offsets within Kafka itself.It supports storing Offsets OOB through HIGH LEVEL CONSUMERS, howeverRequires Idempotent behavior of a Consumer
☑ MessageDeDup ID and MessageGroupID attributes are used.
Requires Idempotent behavior of a Consumer.FIFO supports Exactly-once while Standard Queues support Atleast-Once
Ease of Deployment
☑ For Distributed Topology,
Requires more effort and 3rd party Plugins
☑ Requires ZooKeeper
☑ Managed by AWS
Authentication Support
☑ OOB
☑ OOB
☑ OOB
Authorization aka Acl Support
☑ OOB
☑ OOB
☑ OOB
TLS Support
☑ OOB
☑ OOB
☑ OOB
Non-Bocking Producers
☑
☑ Supports both Synchronous and Async
Performant
⭐ ⭐ Medium to High
⭐ ⭐ ⭐ ⭐ Very High
⭐ ⭐ ⭐ ⭐ Very High
FIFO: 300 tps
Standard Queues: Unlimited
Open Source
☑
☑
Load Balancing Across Consumers
☑
☑ Can be done Through Consumer Groups
☑ Multiple Consumers can read from the same queue in an atomic way
Delay Queues
NOT OOB
NOT OOB
☑ OOB
Visibility Timeout Queues
NOT OOB
NOT OOB
☑ OOB
Message Dedup
☑
Message Size Limits
Upto 256 KB. AWS SDK supports storing large messages in S3 etc though.
No of Messages in a Queue
☑ No limits
☑ No Limits
☑ No Limits but
Standard Queues: 1,20,000 In-Flight Messages
FIFO: 20,000 In-Flight Messages
Details here and here
Messages are In-Flight after they have been received from the queue by a consuming component, but have not yet been deleted from the queue
Message Content Limits
☑ No Limits
☑ No Limits
A message can include only XML, JSON, and unformatted text. The following Unicode characters are allowed: #x9 | #xA | #xD | #x20 to #xD7FF | #xE000 to #xFFFD | #x10000to #x10FFFF
Any characters not included in this list are rejected.
Disaster Recovery
Not OOB
Not OOB but simple. Replicas can be deployed across regions
Not OOB and simple. Requires different Strategies to achieve it.
Often a need arises to migrate the data from one System to another system. These Persistent Data Systems, Source and Destination, could be entirely different, from different vendors.
It could be due to change in requirements or technology advancements.
Add to it the changes in above tier which is making use of Persistent System.
To make sure that everything works fine on new system, you may plan to start executing small %age of traffic on New System and calibrate\compare the results with Old Stack results.
For proper calibration and find out the differences in result set from Old and New Systems, the task in hand is to synchronize the Data across 2 systems, being stored differently in different systems.
If that’s the case, this article can help you achieve Data Synchronization across Heterogeneous Systems on an ongoing basis.
This article aims to present the concept to seamlessly move the data incrementally from your current data storage system to different data storage system, be it on Premise or on cloud.
TERMS USED
Batch: Means a collection of data records to be moved across BatchState: Represents the Status of Batch Transfer, whether it is IN_PROGRESS, FAILED, COMPLETED Metadata: Represents the batch details which will help in detecting the next batch of data to be synchronized
WHICH COMPONENTS ARE INVOLVED?
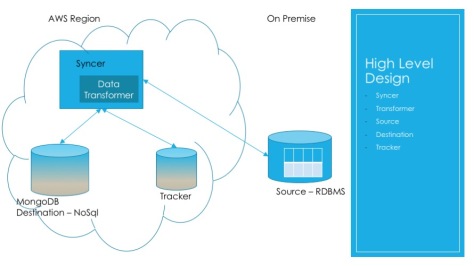
Data Source: Actual source containing the original data to be synchronized Data Destination: This is the Persistent System where you want your data to be moved to Syncer Component: Responsible to detect the incremental changes and synchronize Transformer Component: Responsible to transform the source data structure into Destination DS. This will be required if you restructure the data. Tracker System: Responsible to store the status and the details related to last batch of data being sync’ed
Below diagram depicts the Problem statement of Sync’ing the On-Premise RDBMS data to No-SQL, MongoDB Storage System in AWS Cloud.
WHY INCREMENTALLY?
You may have a huge data in your storage system which you cannot move in a single operation. This could be due to resource constraints of memory, network etc which may hinder the data synchronization.
And what if this data is changed frequently by Biz users. Doing Full synchronization each time can prove to be costly.
How can we reduce this cost? How do we increase the chances of successful data synchronization?
How can we make this process resilient and resume from the point where it stopped or failed the last time?
How about splitting up the Data to be synchronized?
How about defining a batch of data, pull up the data of this batch only and then transfer this data batch?
In order to accomplish this, we need to store the details using which we can determine, how much data we have already sync’ed and what is the next batch of data that we need to sync.
HOW IT WORKS?
Before we go further into steps involved, lets understand the batch Metadata.
batchOffset is the marker. Based on the Status, you can compute from where to begin or resume the process. So, if last batch was successfully sync’ed, next batch to be sync’ed starts with batchOffset+batchSize, or, otherwise, batchOffset in case the last batch failed.
batchSize denotes the no of records you want to sync in a single operation and thus it also tells the amount of data.
It shall neither be too small (otherwise resulting in more roundtrips and more processing time) nor too big (otherwise requiring more resources – memory, network bandwidth etc)
status denotes the sync operation Status of the batch
isIncrementalModeOn denotes whether sync process is just pulling up the incremental updates (including additions) or not. This does mean that source data had been completely synchronized once.
rulesUpdateDateTimeBeginPickedUpForMigration and rulesUpdateDateTimeEndPickedUpForMigration denote the time boundaries for incremental updates. These are useful in pulling up the incremental changes during this time period.
migrationStartDateTime and migrationEndDateTime are useful for tracking purposes to determine how much time did this batch sync take.
With this information, let’s see the sequence of events which happen to sync the batch of data.
The process is initiated or resumed with Syncer component.
Syncer pulls up the last migrated batch details form the Tracker system.
Using Batch Metadata, it identifies the next batch of data to be synchronized.
It makes an entry into Tracker System to store the next batch metadata with IN_PROGRESS status.
It then builds the query, pulls up the records as per next batch metadata from Source system. You can use any ORM, hibernate or jpa to get the data.
It then delegates to Transformer to transform the source data structure to destination data structure.
With transformed data, it identifies the data to be created and data to be updated and accordingly splits the data.
It then sends data to Destination System.
Depending upon the operation status, it marks the Batch either as COMPLETED or FAILED status.
And, these sequence of steps go on till there isn’t any more data to sync.
At this point, isIncrementalModeOn is saved as TRUE in the Tracker system and post this, SYNCER System can tweak the query to pull the data records for a time window.
This slideshow requires JavaScript.
BATCH PROCESS STATE
In case you want to have Primary, Secondary Sync Processes so as to guarantee the High Availability of the Sync Process, we need to maintain and detect the various states of a Sync Process. With this data, we can ensure that at a time, no 2 sync processes are running.
BATCH STATES aka STATUS
Every individual batch of data goes through few states. Below diagram represents the various states, a batch goes through in a syncing process.
THINGS TO KEEP IN MIND
Idempotency and Duplicacy Prevention:
We are transferring a batch of records. Therefore, it may happen that batch gets Partially Succeeded, meaning that few records got sync’ed and rest failed due to any reasons. In such cases, if you retry posting the data, it may result into same data getting saved twice or more. To prevent this, query what data has to be inserted and what data has to be updated. You can make use of indexes or similar concept.
Timezone Differences:
Syncer system and Data Source System can be in different timezones or source data may be stored in a specific Timezone. So, if you are pulling up records based on time window, make sure that timezone information is converted into source system before querying.
Security:
For sensitive data, you can enable SSL/ TLS over transport layer. Also, You may want to have authentication and authorization enabled on both data ends: Source and Destination Storage Systems.
Hard Deletes:
Soft Deletes like making biz rule inactive or likewise will be taken care by Syncer process. What if tuple is hard deleted from a source storage. For Hard deletes, you may have to use Triggers to catch the deleted tuples.
Alert Mechanism to detect Stopped Sync Process:
Sync process can also fail due to any reason. Without any alerting mechanism, it may go unnoticed and these Heterogeneous Systems can go out of sync. To prevent such circumstances, log start, stop events into some sinks like Splunk and have Alerts on them.
WHAT QoS PARAMETERS ARE IMPLEMENTED?
Eventual Consistency
Guaranteed Sync
FaultTolerance
Idempotency
Also, Updates while Sync are not missed
HOSTING MECHANISM
There can be multiple ways to host a Syncer process. Depending upon the traffic your consuming application takes, you can
Either host the syncer process under the same application which relies on this data
Or, host it under a separate process and schedule it using AWS Lambda or AWS Batch
ALTERNATIVES
Amazon DMS also offers the ongoing data migration however it supports only selected Storage Systems. At the time of implementing this, Amazon DMS Offering does not have MSSQL –> MongoDB supported.
If you want to sync data to AWS RDS, Amazon DMS can be used.
Also, if you have huge data ranging in hundreds of TBs and a limited network bandwidth and wants to get this done quickly and only for once, AWS Snowball is another offering you can use.
This article describes a way to create the Scheduled tasks in a system pro-grammatically for Windows Vista, Windows 7 etc Operating Systems using C#.NET language. Windows operating systems, though, already provide a User Interface to see a complete list, to add, to update or to delete a Scheduled Task under it. This UI can be seen by launching a Computer Management by issuing a command compmgmt.msc on a command prompt.
System Requirements Windows Vista or Windows 7 or higher versions Operating systems
Development Environment
Development IDE – Visual Studio [or simple Notepad]
Task Scheduler COM Library
How to Implement?
To begin with, we need an underlying library, can be COM library or unmanaged C(++) library or managed wrapper which talks to the system to get things done.
Aaannnnnnnn.
Don’t worry.
Here is the trick.
If you dare to 🙂 browse to C:\Windows\syswow64, you will notice the presence of Taskschd.dll assembly. This is what we need to proceed with.
Steps:
Create a new Project using Visual Studio
Right Click on project and click Add Reference.Select “TaskScheduler TypeLibrary”
The last step resulted in an Interop assembly generation and referenced in the project. You can check this by selecting a referenced assembly and viewing it’s properties.
Now, we’ll make use of Types defined/exported in the interop assembly to achieve:
– View the list of all Scheduled Tasks
– To pro-grammatically add a Scheduled Task
– To delete a task
Be it any CRUD operation, we’ll make use of ITaskService type which connects to an actual store and exposes the operations. We’ll instantiate the TaskService and call the Connect method before any valid operation.
Before detailing out the steps, another important aspect is to understand the layout or a structure, the tasks are organized.
Scheduled Tasks are organized in a hierarchical fashion. They are always stored in a folder. The very first folder is termed Root Folder with a path @”\” or “\\”. Each folder can have sub folders under it. View the above picture to understand or open “Scheduled Tasks” on your system.
The following sections detail out “How to ?” part for each operation.
How to retrieve the list of all Scheduled Tasks?
Instantiate TaskService object. ITaskService taskService = new TaskScheduler();
Call Connect() on previously created taskService object. taskService.Connect();
Get a reference to Root Folder. ITaskFolder rootFolder = taskService.GetFolder(@"\");
Remember, path to Root Folder is “\”.
Make a call to GetTasks() on a folder. IRegisteredTaskCollection tasks = rootFolder.GetTasks(0); // 0 or 1: 1 will include all hidden tasks as well Note: Here, you will get those tasks only which are created in root folder. Since this root folder can have sub folders under it, you have to recursively call GetTasks() for each sub-folder.
private void Load()
    {
        ITaskService taskService = new TaskScheduler();taskService.Connect();List tasks = new List();// “\\” or @”\” is the RootFolder
        this.GetData(taskService.GetFolder(@”\”), tasks);
        this.view.ScheduledTasks = tasks;
    }

    private void GetData(ITaskFolder folder, List tasks)
    {
        foreach (IRegisteredTask task in folder.GetTasks(1)) // get all tasks including those which are hidden, otherwise 0
        {
            tasks.Add(task);

            System.Runtime.InteropServices.Marshal.ReleaseComObject(task); // release COM object

            foreach (ITaskFolder subFolder in folder.GetFolders(1))
            {
                this.GetData(subFolder, tasks);
            }
        }
        System.Runtime.InteropServices.Marshal.ReleaseComObject(folder);
    }
How to delete a Scheduled Task?
We need some task details like task name, task container i.e. folder in which this task exists in order to delete it.
By default, each task’s Location property contains the Name of that particular task as well as it’s containing folder. So if we have an access to Task Location only, we can find out it’s name and it’s containing folder through some string manipulation.
For e.g., “\\SampleTaskFolder\\SampleTask” means that the task named SampleTask is stored in a folder SampleTaskFolder which is further in RootFolder(“\\”). Steps to delete a task when it’s full location is provided as input:
Find out the name of Task and it’s containing folder through string manipulation. [You may want to Validate the input:task Location]
Instantiate a task service and connect
Get the containing folder reference through below code: ITaskFolder containingFolder = taskService.GetFolder(folderPath);
Call DeleteTask() with a task name containingFolder.DeleteTask(taskName, 0);
This is how a complete function may Look like:
public bool DeleteTask(string taskPath)
{
ITaskService taskService = new TaskScheduler();taskService.Connect();ValidateTaskPath(taskPath);

int lastIndex = taskPath.LastIndexOf(“\\”);

string folderPath = taskPath.Substring(0, lastIndex);

if (string.IsNullOrWhiteSpace(folderPath))
{
folderPath = “\\”;
}

string taskName = taskPath.Substring(lastIndex + 1);

try
{
ITaskFolder containingFolder = taskService.GetFolder(folderPath);

containingFolder.DeleteTask(taskName, 0);
}
catch(FileNotFoundException exception)
{
throw new InvalidTaskPath(“Task Path is invalid”, exception);
}

return true;
}
How to create\update a Scheduled task?
Creating a Scheduled task is not as easy as other operations. Before i detail out the steps here, i am pinpointing few things which are expected by COM and it’s behavior, to get our new task registered successfully in the system.
Name of a new Task to be created can be empty while doing registration. If this is the case, system will generate a GUID and assign this as a name of a task
The ExecutionTimeLimit, IdleDuration parameters under ITaskDefinition [see “Possible error and exceptions” section below] should be in a particular format. If this is not the case, new task won’t be registered
Atleast one action should be specified when registering a new task
If a task with the same name under the same folder exists, it will be updated if you register a task with a flag: “CreateOrUpdate” has a value of ‘6’. It is the 3rd argument passed in a call to RegisterTaskDefinition()
Now, let’s see how can we achieve this programmatically using C#.NET.
The below code will create\update a task under a Root Folder “\”. You may choose to create under a sub-folder.
Steps to create a task under Root Folder:
Instantiate a task service and connect ITaskService taskService = newTaskScheduler();
Create a new task using task Service object. This requires calling “taskService.NewTask(0)” ITaskDefinition taskDefinition = taskService.NewTask(0);
Configure a new Task – all desirable properties like – Name, Description, Triggers, Actions, Author etc.
taskDefinition.RegistrationInfo.Description = "task Description Goes Here";

taskDefinition.RegistrationInfo.Author = "task Author domainName\userName goes here";
taskDefinition.Settings.Enabled = “true or false”;
taskDefinition.Settings.Hidden = “true or false”;
taskDefinition.Settings.Compatibility = _TASK_COMPATIBILITY.TASK_COMPATIBILITY_V2_1;if (“You want to set the execution time limit for Task Actions”)
{ TimeSpan timespan = TimeSpan.FromMinutes(“No of minutes goes here”);// this is the format needed by COM
taskDefinition.Settings.ExecutionTimeLimit = XmlConvert.ToString(timespan);
}
if (“You want to allow the task to execute only when system is idle for so many minutes”)
{
taskDefinition.Settings.RunOnlyIfIdle = “true or false”;
TimeSpan timespan = TimeSpan.FromMinutes(“Number of Minutes Goes Here”);
// this is the format needed by COM
taskDefinition.Settings.IdleSettings.IdleDuration = XmlConvert.ToString(timespan);
}
Configure triggers, if any ITriggerCollection triggers = taskDefinition.Triggers; ITrigger trigger = triggers.Create("type of Trigger goes here"); // _TASK_TRIGGER_TYPE2 enumeration
trigger.Enabled = "true or false";
trigger.StartBoundary = DateTime.Now.ToString(Constants.DateTimeFormatExpectedByCOM);if (“You want this trigger to expire after sometime”)
{
trigger.EndBoundary = DateTime.Now.EndTime.ToString(Constants.DateTimeFormatExpectedByCOM);
}
Configure Actions [atleast one] IActionCollection actions = taskDefinition.Actions; _TASK_ACTION_TYPE actionType = "type of action you want goes here"; IAction action = actions.Create(actionType);switch (actionType)
{ case_TASK_ACTION_TYPE.TASK_ACTION_EXEC: IExecAction execAction = action as IExecAction;execAction.Path = “Path to Program To Run goes here”;
execAction.Arguments = “Optional Arguments goes here when starting the above executable”; break;case _TASK_ACTION_TYPE.TASK_ACTION_SEND_EMAIL: IEmailAction mailAction = action as IEmailAction;
Till this point, we have configured task settings, triggers, actions, conditions. Now we need to register this task definition under some folder, RootFolder – “\”, here // creating this task in the root Folder // Create SubFolder under RootFolder, if you require ITaskFolder rootFolder = taskService.GetFolder(@"\");// ‘6’ as argument means this task can be created or updated [“CreateOrUpdate” flag] // if Name id empty or null, System will create a task with name as GUID
rootFolder.RegisterTaskDefinition(task.Name, definition, 6, null, null, _TASK_LOGON_TYPE.TASK_LOGON_NONE, null);
That’s all we need to do. If luck goes with you:), you won’t get errors [not like me]. Just kidding.
If you get a new error, contact me. I’ll try to find a cause and suggest you a resolution.
Cause: “ExecutionTimeLimit”/ “IdleDuration” are expected in some format by COM and not just simple ToString() conversion Resolution: Use System.Xml.XmlConvert.ToString(). [Spent lot of time to get to this]
Cause: This means tat atleast one action should be specified when registering a task definition for a new task.
Simply put, a task should define atleast one action Resolution: Specify atleast one action – be it : To send an email or To execute a task or To display a message
System.Runtime.InteropServices.InvalidComObjectException was caught
Message=COM object that has been separated from its underlying RCW cannot be used.
Source=mscorlib
StackTrace:
at System.StubHelpers.StubHelpers.StubRegisterRCW(Object pThis, IntPtr pThread)
at TaskScheduler.ITaskService.get_Connected()InnerException:
Cause:
You are trying to work on the Released TaskScheduler COM object Resolution:
Create a new object of TaskScheduler , connect and carry on with your task operation
Error Code: -2147221163. Interface not registered while creating a task.
Yet to identify the real cause and resolution. [Noticed this when i share the same TaskScheduler instance and use it from diferent win forms]
Successor and much more powerful webpart than Dataform or ListViewWebpart provided in Sharepoint 2010, yes, that’s true.
As mentioned in msdn, it handles view rendering for lists which can be document libraries as well as announcements. As the name suggests, it uses a XSLT i.e transforms for Html rendering. Xml data obtained as per Query and XmlDefinition, explained later, is converted into html using Xslt. It, by default, applies styles [ViewStyles] as provided by Sharepoint.
It provides an option to enable column filtering, sorting, Paging and AJAX as well. Yes, filtering, sorting, Paging can be done async, without whole page refresh using AJAX option.
What’s more? You can even define your own custom xsl defining styles, rendering and you have a data rendered the way you want. Custom xslt can override default templates and thus has a power to completely replace default XSLTs which is rarely needed.
For e.g. Dates to be shown in a particular format or you want to specify custom header names rather than display names defined in a list definition or a view.
Isn’t it powerful from what we had earlier?
Why am i writing this?
In my project, i had a requirement to show latest 5 documents with a More… button at the bottom in a page which had other data as well. It should support sorting, filtering but without paging. And most importantly, to show list data which exists in a different site collection.
Surely this is achievable by writing a custom visual web part and a backend code but how much time does this require? If you are following a layered approach and are following a well-defined architecture :), which you will be as a good coder, it can take a lot of time with a filtering, sorting support. And what if Client demands for Paging later. This usually happens in Agile methodology. Plus why to forget a testing?
This is where XsltListView webpart can be handy, inbuilt webpart, already test proven, just set few properties as per your requirements and you are good to go.
But…
What to set, when, why? If you want to use this webpart and you don’t have knowledge how to use it, I pray to God.
You have now 2 options:
Either spend a lot of time yourself, exploring this XsltListViewWebpart, or
Refer to this blog :). If not 100% , it will definitely save more than 75% of your efforts in fiddling around
How to use?
Following are the few properties which must be considered when using this webpart:
This article describes the way to read or write into the excel workbook(or a file, used interchangeably) pro-grammatically using C#.NET language and ACE Oledb data providers by Microsoft.
This covers the following topics:
System Requirements
Development Environment
Versions of Excel files which can be read or written
How to build a connection string?
How to build a command string?
Possible errors and exceptions
System Requirements
To read/write the excel worksheet using ACE oledb providers, MS office need not to be installed on a machine. An installable package containing ACE oledb providers can be installed from ACE OLEDB Installer Location
Go to this link to install the required version and also check the system requirements. Note: You can install either 32 bits version or 64 bits version but not both. Also, if you have 64 bits office installed then you can’t install 32 bits ACE oledb and vice versa.
Check the requirements carefully on the page.
Using Hibernate and Struggling with querying DateTime Column in RDBMS (like MS-SQL) in specific timezone?
No matter what Timezone your DateTime object has, while issuing hibernate query,
do you observe that Time in Default Timezone of JVM is always getting passed and thus not giving you desired results?
If that’s the case, this article describes a process to achieve querying DateTime column with specific timezone.
WHY THIS HAPPENS?
It is because your Application Server and Database Server are running in Different TimeZones.
If your Application Server and Database Server are running in different TimeZones, we need to ensure that the Date Time query parameter values shall be sent as per DB Timezone to get desired results.
Let’s understand how does Hibernate\DB Driver forms a Sql Query in the next section.
HOW HIBERNATE CREATES A QUERY?
On an Application Server, DB Driver forms a Command before sending it to RDBMS. Database System then executes the query (may compile if needed) and return the results accordingly.
DB Driver instantiates a Command in the form of PreparedStatement object. Then, DBConnection is attached with the above Command Object on which this command will be executed. Since we want to query by certain parameters,DateTime in our case, DB Driver sets the query parameters on the command.
PreparedStatement exposes few APIs to set different parameters depending upon the type of the parameter.
To pass DateTime information, various APIS being exposed are:
setDate
setTime
setTimestamp
All these functions allow passing Calendar object to be passed. Using this Calendar object, Driver constructs the SQL DateTime value.
If this Calendar object is not passed, Driver then uses the DEFAULT TIMEZONE of the JVM running the application. This is where things go wrong and desired results are not obtained.
How can we solve it then?
DIFFERENT APPROACHES
Setting same timezone of the Application Server and of DB Server
Setting timezone of the JVM as that of DB Server
By extending the TimestampTypeDescriptor and AbstractSingleColumnStandardBasicType classes and attaching to the Driver
1st and 2nd Approaches are fine, however these can have side-effects.
1st can impact other applications which are running on the same system. Usually, 1 application runs on a single server in Production or LIVE environment, however, with this we are delimiting the deployment of other applications.
2nd approach is better than 1st one since it will not impact other applications, however, the caveat here is what if your application is talking to different DB Systems which are in different timezones. Or, what if you want to set TimeZone on only few selected Time Fields.
3rd approach is flexible. It allows you to represent different time fields in even different time zones.
AlRight. Can we have steps then to implement Approach #3
STEPS FOR 3rd Approach:
Provide Custom TimestampTypeDescriptor and AbstractSingleColumnStandardBasicType
Implement Descriptor class as given below:
import java.sql.CallableStatement;
import java.sql.PreparedStatement;
import java.sql.ResultSet;
import java.sql.SQLException;
import java.sql.Timestamp;
import java.util.Calendar;
import java.util.TimeZone;

import org.hibernate.type.descriptor.ValueBinder;
import org.hibernate.type.descriptor.ValueExtractor;
import org.hibernate.type.descriptor.WrapperOptions;
import org.hibernate.type.descriptor.java.JavaTypeDescriptor;
import org.hibernate.type.descriptor.sql.BasicBinder;
import org.hibernate.type.descriptor.sql.BasicExtractor;
import org.hibernate.type.descriptor.sql.TimestampTypeDescriptor;

/**
 * Descriptor for {@link Types#TIMESTAMP TIMESTAMP} handling with zone.
 */
public class CustomZonedTimestampDescriptor extends TimestampTypeDescriptor {
    public static final CustomZonedTimestampDescriptor PST_INSTANCE = new CustomZonedTimestampDescriptor();

    /**
     * Instantiate an object of CustomZonedTimestampDescriptor with Timezone set to "America/Los_Angeles"
     */
    public CustomZonedTimestampDescriptor() {
        this.calendar = Calendar.getInstance(TimeZone.getTimeZone("America/Los_Angeles"));
    }

    /**
     * Instantiate an object of CustomZonedTimestampDescriptor
     * @param zone Timezone to be used
     */
    public CustomZonedTimestampDescriptor(TimeZone zone) {
        this.calendar = Calendar.getInstance(zone);
    }

    /**
     * Get the binder (setting JDBC in-going parameter values) capable of handling values of the type described by the
     * passed descriptor.
     *
     * @param javaTypeDescriptor The descriptor describing the types of Java values to be bound
     *
     * @return The appropriate binder.
     */
    @Override
    public <X> ValueBinder<X> getBinder(final JavaTypeDescriptor<X> javaTypeDescriptor) {
        return new BasicBinder<X>( javaTypeDescriptor, this ) {
            @Override
            protected void doBind(PreparedStatement st, X value, int index, WrapperOptions options) throws
                    SQLException {
                st.setTimestamp(index, javaTypeDescriptor.unwrap(value, Timestamp.class, options), calendar);
            }
        };
    }

    /**
     * Get the extractor (pulling out-going values from JDBC objects) capable of handling values of the type described
     * by the passed descriptor.
     *
     * @param javaTypeDescriptor The descriptor describing the types of Java values to be extracted
     *
     * @return The appropriate extractor
     */
    @Override
    public <X> ValueExtractor<X> getExtractor(final JavaTypeDescriptor<X> javaTypeDescriptor) {
        return new BasicExtractor<X>( javaTypeDescriptor, this ) {
            @Override
            protected X doExtract(ResultSet rs, String name, WrapperOptions options) throws SQLException {
                return javaTypeDescriptor.wrap(rs.getTimestamp(name, calendar), options);
            }

            @Override
            protected X doExtract(CallableStatement statement, int index, WrapperOptions options) throws SQLException {
                return javaTypeDescriptor.wrap(statement.getTimestamp(index, calendar), options);
            }

            @Override
            protected X doExtract(CallableStatement statement, String name, WrapperOptions options)
                    throws SQLException {
                return javaTypeDescriptor.wrap(statement.getTimestamp(name, calendar), options);
            }
        };
    }

    private final Calendar calendar;
}
In the above code, Default constructor uses PST Timezone by default. For other TimeZones, simply use the Parameterized Constructor.
Implement Type class and use the above Descriptor class
import com.expedia.www.air.commission.migration.db.descriptors.CustomZonedTimestampDescriptor;

import java.util.Comparator;
import java.util.Date;
import java.util.TimeZone;

import org.hibernate.dialect.Dialect;
import org.hibernate.engine.spi.SessionImplementor;
import org.hibernate.type.AbstractSingleColumnStandardBasicType;
import org.hibernate.type.LiteralType;
import org.hibernate.type.TimestampType;
import org.hibernate.type.VersionType;
import org.hibernate.type.descriptor.java.JdbcTimestampTypeDescriptor;

/**
 * A type that maps between {@link java.sql.Types#TIMESTAMP TIMESTAMP} and {@link java.sql.Timestamp} with zone
 */
public class CustomZonedTimestampType extends AbstractSingleColumnStandardBasicType<Date>
        implements VersionType<Date>, LiteralType<Date> {
    /**
     * Instantiate an object of CustomZonedTimestampType with Timezone set to "America/Los_Angeles"
     */
    public CustomZonedTimestampType() {
        this(CustomZonedTimestampDescriptor.PST_INSTANCE);
    }

    /**
     * Instantiate an object of CustomZonedTimestampType
     * @param zone Timezone to be used
     */
    public CustomZonedTimestampType(TimeZone zone) {
        super(new CustomZonedTimestampDescriptor(zone), JdbcTimestampTypeDescriptor.INSTANCE);
    }

    /**
     * Returns the abbreviated name of the type.
     * @return String the Hibernate type name
     */
    @Override
    public String getName() {
        return TimestampType.INSTANCE.getName();
    }

    /**
     * Convert the value into a string representation, suitable for embedding in an SQL statement as a
     * literal.
     * @param value The value to convert
     * @param dialect The SQL dialect
     * @return The value's string representation
     * @throws Exception Indicates an issue converting the value to literal string.
     */
    @Override
    public String objectToSQLString(Date value, Dialect dialect) throws Exception {
        return TimestampType.INSTANCE.objectToSQLString(value, dialect);
    }

    /**
     * Generate an initial version.
     * @param session The session from which this request originates.
     * @return an instance of the type
     */
    @Override
    public Date seed(SessionImplementor session) {
        return TimestampType.INSTANCE.seed(session);
    }

    /**
     * Increment the version.
     * @param current the current version
     * @param session The session from which this request originates.
     * @return an instance of the type
     */
    @Override
    public Date next(Date current, SessionImplementor session) {
        return TimestampType.INSTANCE.next(current, session);
    }

    /**
     * Get a comparator for version values.
     * @return The comparator to use to compare different version values.
     */
    @Override
    public Comparator<Date> getComparator() {
        return getJavaTypeDescriptor().getComparator();
    }
}
Add an annotation @Type on the fields for which proper Timezone has to be used
@Entity
public class MyEntityClass implements Serializable {
    public static final String CUSTOMIZED_TIMESTAMP_TYPE = "com.db.types.CustomZonedTimestampType";

    public Date getUpdateDate() {
        return updateDate;
    }

    public void setUpdateDate(Date updateDate) {
        this.updateDate = updateDate;
    }

    @Type(type = CUSTOMIZED_TIMESTAMP_TYPE)
    private Date updateDate;
}
As per the above code, MyEntityClass has a field named upDateDate for which we want to send the date and time in correct Timezone.
ADVANTAGES
Reliability: Expected Results from DB are obtained
No other application running on a same system is impacted
Most importantly, the above steps enable a code to be run on any system set in any TimeZone
In this article, i will talk about the Running Instance Health, what can represent the Health, how can we detect the health and how can we use this health information to make the System resilient.
Health, basically, defines how well an instance is responding. Health can be:
UP
DOWN
REAL LIFE PROBLEM
Imagine you reach a Bank and found it being closed. Or, Imagine you are standing in a bank counter queue and waiting to be served. By the time your turn arrives, person sitting at a counter goes away. May be that person is not feeling well.
How would you feel in such a situation? Irritated? Frustrated?
What if you would have been told upfront about this situation? Your time would not have wasted. You would not have felt bad.
But what if someone else takes a job of that counter and start serving you.
Now, imagine a pool of servers hosting a site which allows you to upload a video, say http://www.Youtube.com. You are trying to upload a small video of yours on a site and every time you try to upload, you get some error after sometime and video could not be uploaded.
Basically, Software Applications like http://www.youtube.com run on machines – be it physical or virtual in order to get desired results. Executing these applications require machine’s local resources like memory, cpu, network, disk etc or other external dependencies to get things done.
These resources are limited and executing multiple tasks concurrently put a risk of contention and exhaustion.
It may happen that enough resources are not available for execution and thus the task execution will eventually fail.
In order to make the system Resilient, one of the things that can be done is Proactively determine the Health Status and report it – to LoadBalancer or to Service Discoverers etc whenever asked, to prevent or deal with the failures.
Reporting a health Status with proper Http Status Codes like 200 for UP and 500 for DOWN can be quite useful.
WHAT CAN DEFINE INSTANCE\PROCESS HEALTH?
Below is a list of some common metrics that can be useful in detecting the health of an instance:
Pending Requests
Container Level
Message Level
Latency Overhead – Defined as the TP99 latency added by this application/layer
TP99 or TP95 or TP75 as per your Service SLAs
Resources
% Memory Utilization – Leading towards OOM
% CPU Utilization
Host Level
Process Level
Number of Threads
Any Business KPI
External Dependencies Failures optioanlly
Identifying a list of above criterias is important as well as choosing the correct Threshold or Saturation Values as well.
Too low values or high values can result into system unreliability.
WHY IS IT IMPORTANT?
System is usually expected to be highly available and reliable. High Availability can be achieved through Redundancy where in multiple server instances are running in parallel, processing the requests and thus the demand.
What if One or more instances are running out of resources and thus not able to meet the demand.
Detecting such a state at an appropriate time and taking an action can help in achieving High Availability and Reliability of the System.
It helps in making the system resilient against failures.
ACTIONS ON DETECTING UNHEALTHY
REPLENISH thru REBOOT: If you have limited servers pool capacity and cannot increase the capacity, the unhealthy machine has to be restarted\rebooted in order to get it back to healthy state.
REPLACE: If you have unlimited server capacity or using Cloud Computing Framework – AWS, Azure, Google Cloud etc, rather than rebooting the machine, you have an option of starting a new machine and killing and removing the old unhealthy machine from processing the requests.
Once an instance is detected unhealthy, instance shall be replenished or replaced.
Either that unhealthy instance shall be rebooted to get it to Healthy state or be replaced with a new server which is put behind LoadBalancer and old being removed from LoadBalancer.
These settings prevent the In-Flight requests to be aborted prematurely.
Without these settings, data can be inconsistent state
Report Health with Proper Http Status Codes
200 for UP
500 for DOWN
CODE IMPLEMENTATION
Basically, what we need is to peek into current metrics and evaluate the Health as UP or DOWN
So, we need an HealthEvaluator, List of HealthCriteria, Some Operators and Health Definition.
public interface IHealthEvaluator {
    /**
     * Return an indication of health.
     * @return the health after consulting different metrics
     */
    Health health();
}
public final class CompositeMetricBasedHealthEvaluator implements IHealthEvaluator {
    /**
     * Instantiates an object of CompositeMetricBasedHealthEvaluator
     * @param healthCriteriaList List containing Metrics to be used for Health Evaluation
     * @param metricReadersList List containing Metric Readers
     */
    public CompositeMetricBasedHealthEvaluator(List<HealthCriteria<Number>> healthCriteriaList,
                                               List<MetricReader> metricReadersList) {
        this(healthCriteriaList, metricReadersList, null);
    }

    /**
     * Instantiates an object of CompositeMetricBasedHealthEvaluator
     * @param healthCriteriaList List containing Metrics to be used for Health Evaluation
     * @param metricReadersList List containing Metric Readers
     * @param metricsList List containing the Public Metrics
     */
    public CompositeMetricBasedHealthEvaluator(List<HealthCriteria<Number>> healthCriteriaList,
                                               List<MetricReader> metricReadersList,
                                               List<PublicMetrics> metricsList) {
        this.healthCriteriaList = CollectionUtils.isNotEmpty(healthCriteriaList)
                ? ListUtils.unmodifiableList(healthCriteriaList) : ListUtils.EMPTY_LIST;
        this.metricReaderList = metricReadersList;
        this.metricsList = metricsList;
    }

    /**
     * Return an indication of health.
     * @return the health after consulting different metrics
     */
    @Override
    public Health health() {
        Health.Builder curHealth = Health.up();
        Status status = Status.UP;
        for (HealthCriteria healthCriteria : this.healthCriteriaList) {
            String metricName = healthCriteria.getMetricName();
            if (StringUtils.isNotBlank(metricName)) {
                Metric metric = this.getFirstMatchingMetric(metricName);
                if (metric != null) {
                    status = evaluate(healthCriteria, metric);
                    curHealth.withDetail(metricName, String.format("Value:%s, Status:%s", metric.getValue(), status));
                } else {
                    curHealth.withDetail(metricName, Status.UNKNOWN);
                }
            }
        }

        curHealth.status(status);

        return curHealth.build();
    }

    private Metric getFirstMatchingMetric(String name) {
        Object metricProvider = this.selectedMetricProvider.get(name);

        if (metricProvider instanceof MetricReader) {
            return find((MetricReader) metricProvider, name);
        } else if (metricProvider instanceof PublicMetrics) {
            return find((PublicMetrics) metricProvider, name);
        }

        // Preference to use MetricReaders
        if (CollectionUtils.isNotEmpty(this.metricReaderList)) {
            for (MetricReader metricReader : this.metricReaderList) {
                Metric<?> metric = find(metricReader, name);
                    if (metric != null) {
                        this.selectedMetricProvider.put(name, metricReader);
                        return metric;
                    }
            }
        }

        if (CollectionUtils.isNotEmpty(this.metricsList)) {
            for (PublicMetrics publicMetrics : this.metricsList) {
                Metric<?> metric = find(publicMetrics, name);
                if (metric != null) {
                    this.selectedMetricProvider.put(name, publicMetrics);
                    break;
                }
            }
        }

        return null;
    }

    private static Status evaluate(HealthCriteria healthCriteria, Metric metric) {
        int result = compare(metric.getValue(), healthCriteria.getThresholdOrSaturationLevel());
        ComparisonOperator op = healthCriteria.getOperator();

        if ((ComparisonOperator.EQUAL.equals(op) && result != 0) ||
                (ComparisonOperator.LESS_THAN.equals(op) && result >= 0) ||
                (ComparisonOperator.LESS_THAN_EQUAL.equals(op) && result > 0) ||
                (ComparisonOperator.GREATER_THAN.equals(op) && result <= 0) ||
                (ComparisonOperator.GREATER_THAN_EQUAL.equals(op) && result < 0)) {
            return Status.DOWN;
        }

        return Status.UP;
    }

    private static Metric<?> find(MetricReader reader, String name) {
        try {
            return reader.findOne(name);
        } catch (RuntimeException ex) {
            // Ignore the Runtime exceptions
            return null;
        }
    }

    private static Metric<?> find(PublicMetrics source, String name) {
        return (Metric<?>) CollectionUtils.find(source.metrics(),
                (met) -> StringUtils.equalsIgnoreCase(((Metric) met).getName(), name));
    }

    private static int compare(Number n1, Number n2) {
        if (n1 != null && n2 != null) {
            return Double.compare(n1.doubleValue(), n2.doubleValue());
        }

        if (n1 != null) {
            return 1;
        }

        if (n2 != null) {
            return -1; // Even for -ive numbers
        }
        return 0;
    }

    private final List<HealthCriteria<Number>> healthCriteriaList;
    private final List<PublicMetrics> metricsList;
    private final List<MetricReader> metricReaderList;
    private final Map<String, Object> selectedMetricProvider = new HashMap<>();
}
HealthCriteria defines 3 things: what has to be checked, it’s expected value(or a range) and Operator. Value can be integer, float or decimal etc
public class HealthCriteria<TInput extends Number> {
    /**
     * Gets the Operator
     * @return Operator to be used for health evaluation
     */
    public ComparisonOperator getOperator() {
        return operator;
    }

    /**
     * Sets the Operator
     * @param operator Operator to be used for health evaluation
     */
    public void setOperator(ComparisonOperator operator) {
        this.operator = operator;
    }

    /**
     * Gets the Threshold or Saturation value against which health evaluation to be done
     * @return Threshold or Saturation value
     */
    public TInput getThresholdOrSaturationLevel() {
        return thresholdOrSaturationLevel;
    }

    /**
     * Sets the Threshold or Saturation value against which health evaluation to be done
     * @param thresholdOrSaturationLevel Threshold or Saturation value
     */
    public void setThresholdOrSaturationLevel(TInput thresholdOrSaturationLevel) {
        this.thresholdOrSaturationLevel = thresholdOrSaturationLevel;
    }

    /**
     * Gets the name of the metric to be used for health evaluation
     * @return Metric name
     */
    public String getMetricName() {
        return metricName;
    }

    /**
     * Sets the name of the metric to be used for health evaluation
     * @param metricName Metric name
     */
    public void setMetricName(String metricName) {
        this.metricName = metricName;
    }

    private String metricName;
    private TInput thresholdOrSaturationLevel;
    private ComparisonOperator operator;
}
@Configuration
@ConfigurationProperties("healthIndicator")
public class HealthCriteriaList {
    public List<HealthCriteria<Number>> getCriterias() {
        return criterias;
    }

    public void setCriterias(List<HealthCriteria<Number>> criterias) {
        this.criterias = criterias;
    }

    private List<HealthCriteria<Number>> criterias;
}
Using the above code, you can evaluate the Health based on metrics and plug it into any application, be it SPRINGBOOT or DROPWIZARD or CXF etc
SPRINGBOOT ADAPTER like below can be used which can easily plug into and start evaluating the health based on metrics.
public final class MetricBasedSpringBootAdapter implements HealthIndicator {
    /**
     * Instantiates an object of MetricBasedSpringBootAdapter
     * @param healthEvaluator Reference to an instance of IHealthEvaluator impl
     */
    public MetricBasedSpringBootAdapter(IHealthEvaluator healthEvaluator) {
        Assert.notNull(healthEvaluator, "Underlying HealthEvaluator");
        this.underlyingHealthEvaluator = healthEvaluator;
    }

    /**
     * Return an indication of health.
     * @return the health for Server Instance after consulting different metrics
     */
    @Override
    public Health health() {
        return this.underlyingHealthEvaluator.health();
    }

    private final IHealthEvaluator underlyingHealthEvaluator;
}
HOW IT WORKS IN SPRINGBOOT?
Spring Boot includes a number of built-in endpoints.
One of the endpoints is the health endpoint which provides basic application health information.
By default, the health endpoint is mapped to /health
On invoking this endpoint, Health information is collected from all HealthIndicator beans defined in your
ApplicationContext and based on Health Status returned by these HealthIndicators, Aggregated Health Status is returned.
Spring Boot includes a number of auto-configured HealthIndicators and allows to write our own.
Since we keep track of certain metrics in our applications, we wanted an ability to evaluate Health based on certain
Metrics’ values. For e.g., if Number of Thread exceed ‘n’, Health shall be reported as DOWN
For this purpose, CompositeMetricBasedHealthEvaluator is implemented.
It relies on either MetricReaders or PublicMetrics to get the Metrics’s current values and evaluate the
Health accordingly.
It reports the Individual Health of all configured Health indicator Criterias and reports Health as DOWN If any of
them is Down.
For Unavailable Metric, Health cannot be determined and thus reported as UNKNOWN for that specific metric.
STEPS TO ENABLE IN SPRINGBOOT
* Enable Health Endpoint if not enabled already
* Configure custom endpoint name optionally and other parameters like Caching of results etc
* Configure MetricReader(s) and\or PublicMetric(s)
* Configure the HealthIndicator Metric Criterias
* Instantiate CompositeMetricBasedHealthEvaluator
* Inject the MetricReaders and\or PublicMetrics and Criterias configured above
* Instantiate and Inject MetricBasedSpringBootAdapter into Spring Application Context
* Inject CompositeMetricBasedHealthEvaluator while instantiating
* Disable\Enable Auto-Configured HealthIndicators
That’s all need to be done to enable Health Evaluation using Metrics.
HOW TO ENABLE HEALTH ENDPOINT?
One of the ways is to enable it through Application Configuration YAML file.
In your application.yml file, put the following configuration:
With the above configuration, 2 Criterias are defined and **HealthCriteriaList** object gets instantiated using
Configuration Annotation.
Here, Thread Criteria specifies that for Health to be **UP**, number of threads < 100.
If NumberOfThreads >= 100, Health will be reported as **DOWN**
Likewise, more criterias can be defined.
Note that
* **metricName** can contain ‘.’ character as well.
* **thresholdOrSaturationLevel** can have any Valid Number, be it Integer or Decimal Number
* **operator** can be any valid value from ComparisonOperator enum.
2) **Same Configuration can be done through code**
List<HealthCriteria<Number>> criterias = new ArrayList<>();

HealthCriteria<Number> criteria = new HealthCriteria<>();
final String expMetricName = "threads";
criteria.setMetricName(expMetricName);
criteria.setThresholdOrSaturationLevel(100);
criteria.setOperator(ComparisonOperator.LESS_THAN);

criterias.add(criteria);
HOW TO PLUGIN MetricBasedSpringBootAdapter?
MetricBasedSpringBootAdapter implements HealthIndicator interface. Thus, simply injecting it into
Spring Application Context will plugin this component for Health Evaluation.
The below configuration instantiates MetricBasedSpringBootAdapter with MetricReaders only.
Both Parameters, healthCriteriaList and metricReaderList are injected automatically through Spring application
context. This happens due to auto configuration.
@Bean
public MetricBasedSpringBootAdapter metricBasedHealthIndicator(
HealthCriteriaList healthCriteriaList,
List<MetricReader> metricReaderList) {
return new MetricBasedSpringBootAdapter(healthCriteriaList.getCriterias(),
metricReaderList);
}
OR,
@Bean
public MetricBasedSpringBootAdapter metricBasedHealthIndicator(
List<HealthCriteria> healthCriteriaList,
List<MetricReader> metricReaderList) {
return new MetricBasedSpringBootAdapter(healthCriteriaList, metricReaderList);
}
OR,
@Bean
public MetricBasedSpringBootAdapter metricBasedHealthIndicator(
HealthCriteriaList healthCriteriaList,
List<MetricReader> metricReaderList,
List<PublicMetrics> publicMetricsList) {
return new MetricBasedSpringBootAdapter(healthCriteriaList.getCriterias(),
metricReaderList, publicMetricsList);
}
The above configuration can be useful wherein MetricReader is not available to read the Metric but Metric is
available publicly through PublicMetrics interface.
With the above configuration, all parameters are injected automatically by Spring.
Things to Note
* Name of Bean minus Suffix HealthIndicator (metricBased) is what is reported as HealthIndicator Name.
* AutoConfiguration of MetricReaders, PublicMetrics or Configuration could be disabled. If this is the case, either
enable AutoConfiguration or manually instantiate MetricReaders, PublicMetrics etc
* PublicMetrics interface can be expensive depending upon the number of metrics being maintained. Use it only if
Custom MetricReader cannot be written or Metrics are small in number.
In Service Oriented Architecture (SOA) or MicroServices Architecture, data is exchanged between different components over the network.
Keeping in mind the INTEROPERABILITY, Data Contracts are created and shared.
Contracts either in the form of WSDL or XSDs etc are mutually agreed between the components to exchange the Structured data among them.
As part of these contracts, you may have a need to send a collection of similar data and for this purpose you may have defined different complexTypes in your xsd.
This article talks about problem associated with defining List Complex Types, how can we overcome this problem using XEW Plugin and the benefits.
Consider you want to exchange a list of AirSegments under an Itinerary like:
AC 12 AC 13 AC 189
To accomplish this, you will define Something like below:
This looks good. Looks Good until we generate the Proxy classes out of these Contracts. Give it a try to generate the classes out of these XSDs using Plugins: JAXB-MAVEN, CXF etc.
You will notice that 3 proxy classes get generated.
@XmlAccessorType(XmlAccessType.FIELD)

@XmlType(name = "OriginDestinationBookedType", propOrder = {

"segmentBookedList"

})

public class OriginDestinationBookedType {

@XmlElement(name = "SegmentBookedList", required = true)

protected SegmentBookedListType segmentBookedList;

public SegmentBookedListType getSegmentBookedList() {

return segmentBookedList;

}

public void setSegmentBookedList(SegmentBookedListType value) {

this.segmentBookedList = value;

}

}
@XmlAccessorType(XmlAccessType.FIELD)

@XmlType(name = "SegmentBookedListType", propOrder = {

"segmentBookeds"

})

public class SegmentBookedListType {

@XmlElement(name = "SegmentBooked", required = true)

protected List segmentBookeds;

public List getSegmentBookeds() {

if (segmentBookeds == null) {

segmentBookeds = new ArrayList();

}

return this.segmentBookeds;

}

}
Many of us are involved in writing scripts, be it for development or testing or deployment.
We make use of different scripting languages. One of them is Powershell.
As the name suggests, it’s really powerful.
You can accomplish so many things in Powershell. But what if you already have something developed in .NET and have an Assembly (remember *.dll file) available with you.
Would you like to mimmick everything in Powershell? Or, would you wish if same .NET assembly can be reused?
I fall in latter category wherever possible. 🙂
Yes, You can reuse .NET library.
Aahhh!!! Great!!! Sounds interesting!!!!
Many of us are aware of this and may be, few of us are not.
Why am i writing this?
I was working on Automating or writing a workflow to deploy Virtual Machines (aka, Persistent VM Role) on Microsoft Azure Cloud.
I did it using Powershell script(You can see a lot of support and sample Powershell scripts already available on MS community sites).
That became simple. However, that’s not all for me.
I am hungry :), Hunger to understand things, go till the roots.
I wanted to understand the code working behind the scenes.
Read this post further…
What are Powershell CmdLets?
In actual, Powershell cmdlets are actually exposed through .NET assemblies only. Bunch of assemblies targetting .NET framework execute to get as results which we want.
If you have worked in .NET, you would have came across Attributes. Yeah, that is how Powershell CMDLETS are exposed.
Classes and fields/parameters are attributed with CmdLet and Parameter.
That’s it. Powershell execution engine can now load these types and execute them.
Bottomline is: Cmdlets are classes annotated with Cmdlet attribute.
How to decompile?
Now, we know that it’s actually a .NET Type in .NET assembly which is getting things done. We all know how to decompile .NET assembly.
We may use 3rd Party Tools, some are free while some are not.
This is not a big deal.
However, how do you identify and locate the Assembly containing this specific CMDLET?
You may say that you are not CLR which is responsible for locating, loading and executing the types besides other things.
Then HOW, you may ask.
For this, we’ll again make use of Powershell Command Prompt.
Open up Command Prompt and execute the following command:
$commandDetailsObj=Get-Command nameOfCommand

/* where,
$commandDetailsObj is how you declare a variable in Powershell,
Get-Command is another Powershell cmdlet, gcm is an alias of this cmdlet,
and,
nameOfCommand is the name of cmdlet which you want to decompile. Say, Add-AzureAccount
*/
The above command will get the details about the cmdlet and store it in $commandDetailsObj variable.
Since cmdlet name can actually be an alias to an actual cmdlet, we keep on doing the below till we get the actual command.
The title of this post may sound a bit strange for those who have not faced this problem but it may sound a Sweet Tune Music 🙂 to those who want to resolve this nasty error in their application.
If you fall into the latter category, you can directly jump to the Solution section though everybody is definitely welcomed to read the entire post.
What is this about?
An error which occurs when using Enterprise Library Data Access Block in instantiating a Database using factory approach.
You may have followed the msdn article to setup DataAccessBlock with the correct code and the configuration in your application but always resulting into the error when you try to instantiate a database object.
Context
Typically, software solutions are multi-layered. One of them being a Data Access Layer, aka DAL, which interacts with the Data Store(s) and performs the CRUD operations on the data in the data store. In this layer, you can either opt for ADO.Net or Enterprise Library Data Access Block to connect to Data Store (database) besides other options.
Since, the post is talking about a specific error resulted in the EntLib, lets assume that we preferred to implement DAL using EntLib Data Access Block.
Problem / Error
Activation error occured while trying to get instance of type Database, key “”
This error occurs on the below code statement, the very first statement to perform the CRUD operation into the DataStore. Database dataStore = DatabaseFactory.CreateDatabase();
or, Database dataStore = DatabaseFactory.CreateDatabase("someKey");
Cause
Enterprise library consists of number of classes in different namespaces and assemblies.
Two of them are:
Microsoft.Practices.EnterpriseLibrary.Data
Microsoft.Practices.EnterpriseLibrary.Common
The above code statement is present in the former assembly. After a series of function calls in the same assembly and the latter assembly, a function in the latter assembly tries to load the former assembly using the partial name.
Note: Loading of an assembly using Partial name
This is what leads to the error if the Enterprise libraries assemblies are GACed and not copied locally into the application directory.
Assembly with a partial name won’t be found in the GAC and then the search/probing of an assembly will continue to Local Application Directory or sub-directories with the same name or as per configuration.
Since assembly is not present anywhere else except GAC, assembly loading will fail and leading to this error.
You can see this in action by launching Fusion Log Viewer utility, which comes by default. Command is : “fuslogvw” in case yof could not locate the utility. Type the command in the Visual Studio Command Prompt.
You may need to customize the Log Viewer to log all binding to disks to view every log.
[You can opt to open this assembly into a Reflector or ILSpy and go through each code statement and function call post the above code statement to understand more.]
So, is there a solution or a workaround for the above problem?
Resolution
This problem is solvable. 🙂
Problem can be solved in many ways, you choose what suits you the best.
You can deploy the enterprise library, “Microsoft.Practices.EnterpriseLibrary.Data” locally to the applcation bin directory. [This may lead to maintaining multiple copies of the same assembly]
Another option is to have the below configuration in the application configuration file. This appears a bit clean approach but again the same configuration change has to be done at multiple places if they are using this library <runtime> <assemblyBindingxmlns="urn:schemas-microsoft-com:asm.v1"> <qualifyAssemblypartialName="Microsoft.Practices.EnterpriseLibrary.Data" fullName="Microsoft.Practices.EnterpriseLibrary.Data, Version=5.0.414.0, Culture=neutral, PublicKeyToken=31bf3856ad364e35"/> </assemblyBinding> </runtime>
This implementation is done using C#.NET. Rectangular Matrix is declared using int[,] syntax. public static long EvaluateDeterminant(int[,] matrix)
{ long determinant = 0;
if (matrix == null || matrix.GetUpperBound(0) != matrix.GetUpperBound(1))
{
Console.WriteLine("Non-square matrix can't have a determinant");
return determinant;
}
int row_UB = matrix.GetUpperBound(0);
determinant = Determinant(matrix, row_UB + 1);
return determinant;
}
private static long Determinant(int[,] matrix, int size)
{ long determinant = 0;
if (size == 1) // 1x1 MAtrix
{
determinant = matrix[0, 0];
} else if (size == 2) // 2x2 MAtrix
{
determinant = matrix[0, 0] * matrix[1, 1] - matrix[0, 1] * matrix[1, 0]; // can hash this multiplication
} else
{ int multiplier = 1;
for (int i = 0; i < size; i++)
{
multiplier = (i % 2 == 0) ? 1 : -1;
return determinant;
}
/// <summary>
/// Gets the Minor of a Square Matrix
/// </summary>
/// <param name="matrix"></param>
/// <param name="size"></param>
/// <param name="rowIndex"></param>
/// <param name="colIndex"></param>
/// <returns></returns>
/// <remarks>
/// If function has to be Public, Certain checks on rowIndex, ColIndex should be made and size need not to be passed
/// </remarks> private static int[,] GetMinor(int[,] matrix, int size, int rowIndex, int colIndex)
{ int minorSize = size - 1; int[,] minor = new int[minorSize, minorSize];
for (int i = 0; i < rowIndex; i++)
{ for (int j = 0; j < colIndex; j++)
{
minor[i, j] = matrix[i, j];
}
}
for (int i = rowIndex + 1; i < size; i++)
{ for (int j = 0; j < colIndex; j++)
{
minor[i - 1, j] = matrix[i, j];
}
}
for (int i = 0; i < rowIndex; i++)
{ for (int j = colIndex + 1; j < size; j++)
{
minor[i, j - 1] = matrix[i, j];
}
}
for (int i = rowIndex + 1; i < size; i++)
{ for (int j = colIndex + 1; j < size; j++)
{
minor[i - 1, j - 1] = matrix[i, j];
}
}